Hi there! If you are planning a Sinhala and Tamil New Year table, this kokis recipe deserves a place right at the front.
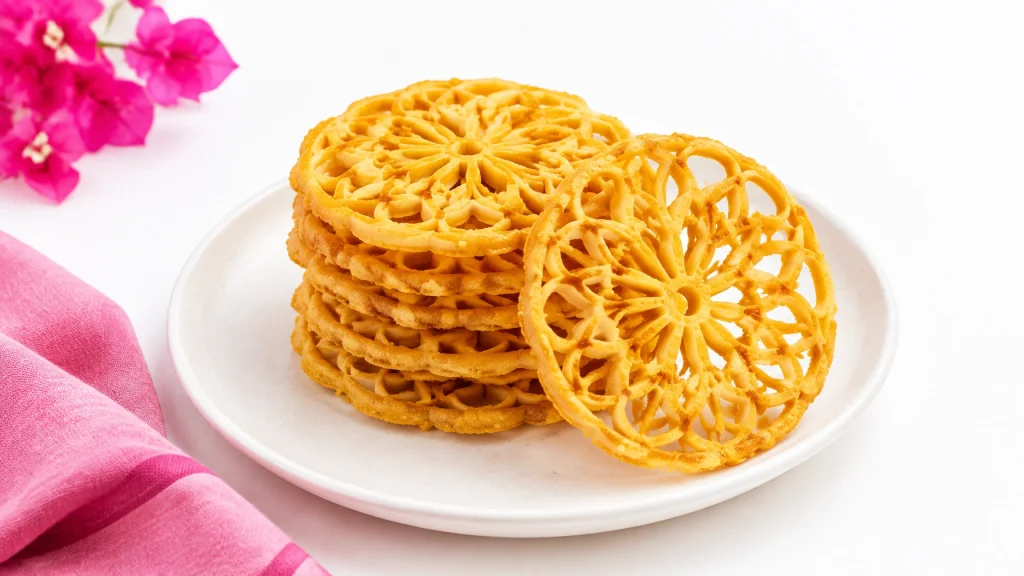
Kokis are delicate, golden, lace-patterned biscuits made with rice flour and coconut milk. They are deep-fried until crisp, then served as part of the festive spread. You will often find them beside sweet kavum, crumbly aluwa, and other traditional New Year treats.
Their flower-like shape makes them look fancy. The method is actually quite simple once you understand the mould. (The mould is the only part that likes to behave dramatically.)
Follow the steps below and you will soon be making crisp, beautiful kokis at home.
What Is Kokis?
Kokis is a traditional Sri Lankan New Year snack made from a thin rice-flour batter. A decorative kokis mould shapes the batter into its familiar rosette or lace pattern while it fries in hot oil.
The finished kokis should be:
- Light and crisp
- Golden yellow
- Delicately patterned
- Dry rather than greasy
- Slightly savoury with a gentle sweetness
Turmeric gives kokis its lovely golden colour. Coconut milk adds richness, while rice flour creates the characteristic crunch.
If you enjoy festive Sri Lankan cooking, you can also try our traditional Kavum recipe. Together, kokis and kavum make a wonderful Avurudu platter.
Ingredients for This Kokis Recipe
This recipe makes approximately 25–30 kokis, depending on the size of your mould.
For the batter
- 2 cups fine rice flour
- 1½ cups thick coconut milk
- ½–1 cup water, added gradually
- 1 large egg, optional
- ½ teaspoon turmeric powder
- ½ teaspoon salt
- 1 teaspoon sugar
For frying
- 4–6 cups coconut oil or neutral cooking oil, enough for deep-frying
- 1 kokis mould
You can find the main ingredients through the Sri Lanka Stores categories:
- Shop rice flour, salt and sugar in Grocery
- Shop coconut milk and coconut oil in Coconut Products
- Shop turmeric in Spices
The egg is optional. It can help the kokis release from the mould and gives the finished biscuits a slightly lighter texture. You can leave it out if you prefer.
Make the Batter

- Add the rice flour, turmeric, salt, and sugar to a large mixing bowl.
- If you are using an egg, beat it lightly in a separate bowl. Add it to the rice-flour mixture.
- Pour in the coconut milk gradually. Whisk as you go.
- Add the water little by little until the batter becomes smooth and pourable.
- Continue whisking until there are no lumps.
Your batter should be similar to a thin pancake or dosa batter. It should coat the back of a spoon lightly, then run off in a steady stream.
Penny’s texture check: Dip a spoon into the batter and lift it. The batter should cling briefly, but it should not sit on the spoon like thick cake mixture.
If the batter looks lumpy, pass it through a fine sieve. This small step helps you create a finer lace pattern.
Let the batter rest for 10–15 minutes. This gives the rice flour time to absorb the liquid and helps the batter fry more evenly.
Heat the Oil and Kokis Mould
Pour the oil into a deep, heavy pan or wok. You need enough oil for the mould to sit comfortably without touching the bottom.
Heat the oil over medium to medium-high heat. If you have a thermometer, aim for approximately 160–175°C (320–350°F).
No thermometer? Dip the handle of a wooden spoon into the oil. Small bubbles should appear around it immediately. If the oil smokes, it is too hot. Lower the heat and wait a moment.
Now place the kokis mould into the hot oil for 30–60 seconds.
The mould must be properly heated before it touches the batter. This is one of the most important parts of the recipe. A cold mould means sticky kokis. Nobody invited sticky kokis to the New Year table.
Dip, Fry, and Release

- Pour some batter into a narrow, deep bowl. The mould should fit inside it easily.
- Lift the hot mould from the oil and allow excess oil to drip back into the pan.
- Dip the mould into the batter, stopping just below the top rim.
- Do not cover the top of the mould with batter.
- Immediately place the coated mould into the hot oil.
- Hold it steady for about 20–30 seconds while the batter begins to set.
- Gently shake the mould or tap its handle against the side of the pan.
- The kokis should slide away from the mould. Let it continue frying freely in the oil.
- Fry for another 30–60 seconds, turning once if needed, until crisp and golden.
- Remove the kokis with a slotted spoon and drain on paper towels.
Reheat the mould in the oil before making each new kokis. Then repeat the dipping and frying process.
Do not overcrowd the pan. Fry one or two at a time, depending on the size of your pan. Too many kokis will lower the oil temperature and leave you with soft, oily results.

Tips for a Perfect Lace Pattern
A beautiful kokis is all about small details. Keep these tips nearby while you work.
Dip only to the rim
If batter covers the top of the mould, it can lock the kokis in place. Leave the top edge clean so the biscuit can release easily.
Keep the mould hot
The mould should spend a few seconds in the oil before every kokis. If it cools down, the batter may not cling properly.
Use smooth batter
Lumps interrupt the delicate lace design. Whisk thoroughly and strain the batter if necessary.
Keep the oil steady
Oil that is too cool produces greasy kokis. Oil that is too hot colours the outside before the inside becomes crisp.
Use a narrow bowl
A narrow bowl makes it easier to coat the mould evenly. A wide, shallow bowl can leave gaps in the batter.
Make a test kokis
Your first kokis is your tester. Check its colour, crispness, and pattern. Adjust the batter or heat before making the rest. (The first one is allowed to be a little quirky.)
Troubleshooting Kokis
Kokis sticks to the mould
The mould may not be hot enough, or you may have dipped it too deeply into the batter.
Fix: Heat the mould longer and dip only to the rim. Hold it in the oil until the edges begin to set, then tap gently to release it.
A new mould may also need seasoning. Heat it in oil several times before your first proper batch.
Kokis turns soft or soggy
Soft kokis usually means the oil was too cool, the pan was overcrowded, or the biscuits were stored before they cooled completely.
Fix: Keep the oil between 160–175°C, fry in small batches, and cool the kokis fully before storing.
Batter is too thick
Thick batter creates heavy kokis and may cling to the mould.
Fix: Add water or coconut milk one tablespoon at a time. Whisk after each addition.
Batter is too thin
Very thin batter may not cling to the mould and can produce fragile kokis.
Fix: Add one tablespoon of rice flour at a time until the batter lightly coats the spoon.
Kokis is pale
The oil may not be hot enough, or you may have removed the kokis too quickly.
Fix: Check the oil temperature and allow the kokis to fry until lightly golden. Turmeric adds colour, but it cannot replace proper frying.
Kokis is too dark
The oil is probably too hot, or the batter contains too much sugar.
Fix: Lower the heat slightly and keep the sugar quantity modest.
Storage and Serving Suggestions
Allow kokis to cool completely on paper towels. Do not seal them while warm, because trapped steam will soften their crisp texture.
Once cool, store them in an airtight container at room temperature. They are best enjoyed within several days, although they can last longer if kept completely dry.
Serve kokis as part of a New Year sweetmeat platter with:
- Kavum
- Aluwa
- Milk toffee
- Ceylon tea
- Fresh fruit
- Other homemade Sri Lankan treats
They are also lovely with a cup of tea in the afternoon. No festival required.
Watch the Kokis Recipe Video
For a visual guide to the batter consistency, mould technique, and release method, watch this traditional kokis walkthrough:
Seeing the mould dip and release is especially helpful if this is your first time making kokis.
Final Thoughts
This kokis recipe uses simple ingredients, but the technique rewards patience. Heat the mould properly. Keep the batter smooth. Dip only to the rim. Control the oil.
Once you get those four things right, the process becomes much easier.
Make a test kokis, adjust as needed, and enjoy the wonderful moment when the first golden rosette slides free from the mould. Then keep going: the festive plate will fill up before you know it.
Serve your kokis beside kavum and aluwa, pour yourself a cup of tea, and enjoy a delicious taste of Sri Lankan New Year tradition. Have fun!